
Fox Body Mustang Explorer Intake Swap
This article will walk you through how I went about an Explorer intake swap on a Fox Body Mustang. Technically, calling this a GT40 Intake Swap is incorrect unless you’re using a true GT40 upper and lower intakes. Either way, upgrading to a better flowing intake setup is a good way to increase horsepower on a Fox Body Mustang. There are a handful of aftermarket intake manifold sets available. However, prices start around $650 for a basic setup and only go up from there.
For the budget minded, there are a few good low cost alternatives available. Ford produced some great flowing production units that bolt right up on a Fox Body. With them you aren’t giving up much power just to save some money. The factory parts produce nearly as much horsepower numbers as the expensive aftermarket parts.

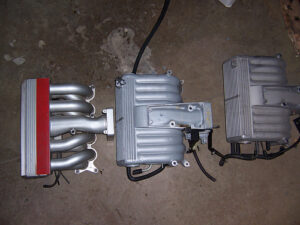
When installed on a Fox Body Mustang the intakes originally installed on mid to late 90’s 5.0 Explorers and the 1993 Cobra Mustangs will net a 15 to 20 horsepower gain. These factory units all produce virtually the same horsepower numbers. The best thing about them is that they are a outright bargain compared to the expensive aftermarket set ups.
I am in no way an expert on these intakes. The following website has much more information that I can post here. http://foxstang.com/gt40-intake-complete-information/
Tony at Junkyarddoggs.com sells the high flowing factory intakes for $175! He cleans them up and does the minor machine work needed to adapt them to the Fox Body. Tony sells all kinds of parts for Fox Body cars. He usually has GT40 heads, 8.8 rear gears and other popular upgrade parts for sale at low prices.
Tony has a popular YouTube channel with a boat load of helpful videos. Check it out and subscribe!
You can also catch Tony on Facebook. He also posts a lot of parts for sale in the Fox Body groups.

I purchased one of Tony’s upgraded intake set ups for my 1989 Mustang LX. The parts arrived quickly and safely. The parts I received were in very nice condition. The quality of Tony’s machine work is also very good. For the money, you can’t beat this set up for bolting on a quick 15 to 20 horsepower.
Our project car has been going through several upgrades. We installed a free flowing H pipe by SMR and BBK shorty headers. A BBK cold air intake and an SVE 70MM throttle body are also waiting their turns to be installed. The JYD intake set up is a great way to tie our intake and exhaust system all together.
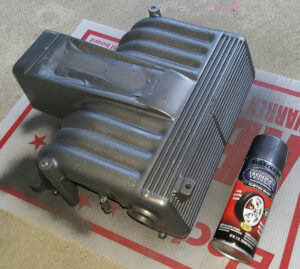
I decided to take it a step further and apply custom colors to my JYD intake. I painted the lower intake a natural aluminum color using VHT’s High Heat Paint.
The upper intake was painted with Rustoleum’s Wheel Paint in a graphite metallic color. Both intakes were prepped well and primed with Rustoleum’s etching primer. I didn’t see that the can of primer state that it is good for “up to” 200 degrees. I could not find a high temp etching primer. An etching primer was used to help paint adhere to the aluminum parts. Hopefully, it will work out ok. If you can source a high temp primer, you should use it. For the plaque I used the etching primer and the same wheel paint.
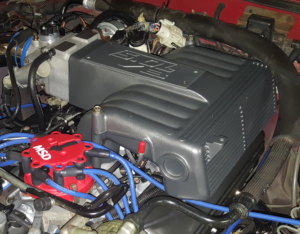
Overall, I think it turned out pretty well. Everything went as expected. There were no surprises during start up. I can definitely feel an increase in power. Especially, in the mid range.
Parts and Supplies
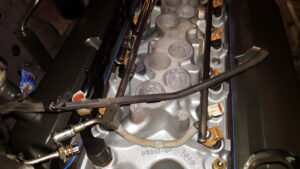
I used Permatex Ultra Black Gasket Maker on the intake, gaskets, sensors and thermostat housing. For the sensors and fittings that see high temps, I used Permatex Red RTV Silicone Sealant. RTV Clean all mating surfaces with brake cleaner or another suitable solvent.
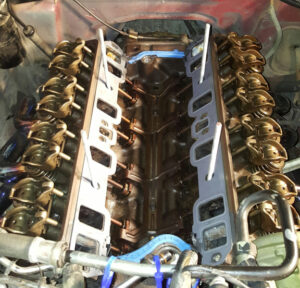
I applied the RTV to the surfaces and let it set up for about 10 minutes. Then, I assembled the parts and finger tightened the fasteners. I waited another 20 minutes and then torqued the fasteners down. In my case, I was able to wait several days allowing the RTV to fully cure before starting the engine. I had zero leaks of any kind.
I used Fel-Pro gaskets for this upgrade. No leaks!
![]()
Gasket List
Individual Gaskets
5511 Distributor O-ring
90361 intake gaskets
93334 Upper to lower
94059 IAC gasket
95504 Intake manifold to block front
95505 Intake manifold to block rear
180 Degree Thermostats
Mr Gasket High Performance 180 Degree Thermostat
Tips and Tricks
Use 5/16″-8 threaded rod to help guide the intake down into position. This will keep the gaskets from moving around on you. Gaskets moving can be a source of leaks. Once you install the other bolts, remove the threaded rods and install the remaining bolts.
Follow Ford’s manifold bolt torquing sequence.
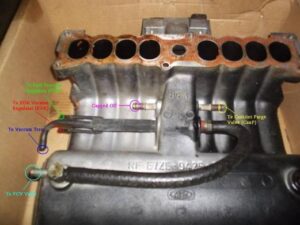
Fox Body intake vacuum line routing. There are multiple ways to route vacuum lines.
Other Fox Body Tech Articles and Resources
Fox Body Mustang 130 Amp Alternator Upgrade
$9 Fox Body LED Dash Light Upgrade
Fox Body Door Handle Replacement
Fox Body Mustang Parts and Accessories
How To Set The Timing On A Fox Body Mustang
Fox Body Mustang Apparel
